Thursday, December 3, 2009

HAPPY HANUKKAH!


Ah, the festival of lights. But why, you might ask, does the minoralterations menorah feature seven beerlights with blue candles, and one beerlight with a white candle suggesting that it is the shamash, which of course is the ninth candle used to light the other eight candles? Simple, because [delete mildly offensive joke involving beer and the invented past participle "shamashed" -- Ed.]

Tuesday, December 1, 2009

SUGARPLUMS, PARTE DOS MIL Y OCHO


2008's holiday card was a bit more labor-intensive than the clementines of 2007.  This time we dropped blobs of ink on the card, blew it with a straw into tree-like shapes, then used a pencil-eraser to stamp red berries on the branches.

[Ed. Note:  Could it be the memory of the hours spent on this project deterred us from making a 2009 card?  Could be.  Could be.  Sorry.  We'll do better in 2010.]

Monday, November 30, 2009

VISIONS OF, LIKE, SUGARPLUMS

We feel the chill in the air and our minds turn to this year's Christmas card.  Just our minds, so far, not our hands.  In the meantime,we'll show a selection of  minoralterations cards from years past. First up, 2007:  we dipped clementines in red paint and stamped them on the card, then added tops (carved from an eraser) stamped in silver and drew hooks on in pencil.

Sunday, November 15, 2009

TYVEK FEELS SO GOOD

We found this chair on the side of the road.  It had no seat at all, and a scuzzy brown upholstered back with crusty foam, and we wanted very much to bring it back to life.  I had been collecting the Tyvek envelopes I received at work for a few months.  I did not have a specific project in mind, but the material is so strong that I was thinking that furniture covering was a possibility.  Besides, it just seemed ridiculous to throw all this stuff away.


The construction went like this: I tore off the seat back upholstery so I was left with just the plywood base;  I cut out a seat bottom from 5/8" plywood; I bought a 4"-thick foam block and cut it to fit the back and seat, duct-taped it down, and wrapped the foam in batting; I then split the envelopes along their seams, trimmed their ragged edges and laid them out to form double-layer sheets big enough to cover the cushions, then scotch-taped the pieces in place, and drew a grid in pencil over the big sheets; P. then took over and sewed over the pencil grid using a zig-zag stitch on the sewing machine (a bonus to all the sewing: it created thousands of perforations so we did not need to make separate air-holes to prevent the completed cushion from popping); we wrapped the sewed sheets around the cushions and attached them with a staple gun.

Finally, we screwed the back cushion to the frame, laid the seat in place, and voila!  A nice looking and thoroughly comfortable chair, all in one busy Sunday.   

Wednesday, June 10, 2009

CONCRETE, MEET CORIAN

This is the story of the first planter in what became an evolving series, which now includes several varieties of vessels with both Corian and wood bases.
The idea was to take the concrete planter idea and adapt it for indoor use.  The slice of Corian underneath the concrete adds a nice color contrast and also protects the shelf or table surface from scratches from the concrete.
I chose a rectangular plastic container as my mold.  For the base, I measured a rectangle that was slightly smaller than the bottom of the container, cut it out using the circular saw and a fine-tooth blade, and rounded the edges off with a file and sanding block.
Then, in order to make the Corian bond to the concrete, I drilled holes (at slow speed) in each corner of the Corian rectangle, counter-sunk the holes, and fitted in flat-head bolts.  I put nuts half-way down each bolt for the concrete to grab onto.  In later models, I switched to wing nuts, then abandoned  the bolts for screws (a tighter seal) and used jar lids wired to the four corner screws as my bonding device.
Next, I prepared the container for the concrete by rubbing a thin film of 3-in-1 oil (later lithium grease or vaseline) around all of the edges.  To allow the concrete to form a ledge over the edge of the Corian base, I filled in the gap between the base and the sides of the container with silicone caulk, and let it dry overnight.  On later efforts, I rubbed a candle on the edge of the Corian before applying the caulk, which helped in the removal process, but still allowed the caulk to cure.
For this first project, I used pre-mixed, general purpose concrete, but filtered out the large pieces of gravel from the mix.  In subsequent projects, I made my own mixes from Portland cement, sand, and various other ingredients.
Before pouring the concrete, I selected a small plastic tub that would make the hole in the top of the planter, and oiled the outside of this tub and set up a piece of wood on two paint cans over my pouring area that would hold the plastic tub at the desired height during the curing process.  Then, I poured the concrete nearly to the top of the main container, sunk in the inner tub, filled the main container to the top, leveled the surface of the concrete with a paint stirrer, and set the container under the wood and paint can set-up.
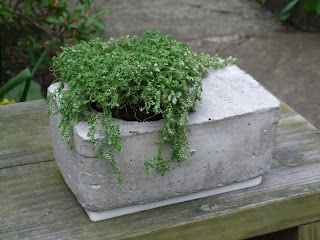
I let the concrete cure for two days then removed the plastic containers.  The inner tub came out pretty smoothly, but I had to cut the main container apart with a knife.  I then peeled the caulk of the edge of the Corian and rubbed the remaining bits off, using sandpaper for a few stubborn ones.  Finally, I cut the inner plastic tub down to that it sat down just under the surface of the planter.  P. said she liked the natural surface of the concrete, so I left this one rough, but later versions have looked quite nice and smooth.  We added a fern and now look how nice!

Saturday, May 30, 2009

SO I BOUGHT A CORIAN COUNTERTOP

I had done some researching on where to buy sheets of hard plastic materials -- acrylic, polypropylene, HDPE, that kind of thing.  I thought there would be some good project potential with this kind of stuff, either furniture (in particular I was thinking about a table top made of the same material as a cutting board we got from Ikea) or something else.  Unfortunately, the hardware and home improvement stores did not seem to stock it, and all the vendors I found wanted over a hundred dollars for slabs more than 2 feet long.  That was too much for experimentation.
Then, on a scrounging trip to the Habitat for Humanity Re-Store, I found the solution.  They were selling second-hand kitchen and bath countertops, those with the sink and faucet holes already cut out, for cheap.  After sorting though the many laminate versions, I found a 6-foot long bathroom countertop made of Corian for $25.  It probably weighed 80 pounds, and I had to borrow a hand saw from the Re-Store to cut the thing in half to fit it into the mighty Corolla, but I got it home.
I started experimenting in the Minoralterations workshop and learned some important facts about Corian.  First, it is brittle, so watch those corners while you are cutting, wear your safety goggles and do not drop your piece -- it will crack or shatter.  Second, when you cut or drill Corian, it "off-gasses," meaning it releases a terrible chemical odor.  I managed to stink up the entire house with just a few cuts, and I became concerned about the toxicity and flammability of the fumes being released.  I now make sure to wear my respirator when I work with the stuff (also good when sanding this super-dense material) and do as much cutting as possible outside.
I learned a few things about cutting and drilling, as well.  First, for straight cuts, my circular saw installed with a fine-tooth blade worked pretty well, but it did start to melt and slow the blade if I pushed too hard.  A new jig saw helped a lot, and a soon-to-arrive carbide blade should made cutting even easier.
For drilling, I read a tip on-line that made a big difference: slow down the speed of your drill.  Before I read this tip, I had my drill-press set up at a high speed for wood and metal.  When I drilled into the Corian at high speed, it quickly melted and jammed the bit.  I am lucky I did not burn out the motor.  However, when I slowed the motor down to its lowest speed, the drill sailed through the Corian like butter. 

Tuesday, May 19, 2009

NY weekend pt. 1: Brooklyn

J and I went to NYC this weekend in search of inspiration, and yes, I think we found some.

We started off with a great meal at the Spotted Pig in the Village (because we were going to need some nutrition for the big afternoon we had planned). Braised radishes with prosciutto were the big hit for John, while I loved my fried duck egg on a bed of asparagus and ramps. Plus beer. Yum.

From there, we headed to DUMBO, a gorgeous old warehouse-y neighborhood that is now full of furniture design shops and coffee, and I guess lots of new condo development. We were armed with a list of shops we had seen in an NYTimes article about Brooklyn design, plus some others I'd found by punching "furniture" into Google Maps. (I knew I had to see "Ugly Luggage" and "Trailer Park." Though the latter consisted of, well, stuff that we've found on the street and painted, which I guess is what the owner does, but he then prices them outrageously. If he can actually sell them for that much, I don't know.)

We didn't always find the shops on our list, but we really enjoyed the walking, from DUMBO to Boerum Hill to Park Slope and then subway to Williamsburg. I really enjoyed seeing all the different types of shops people had developed, from high end design to recycled junk to ironic trashy kitsch to nicely curated collections of lovely things.

Later we met old friends for dinner at Five Leaves. Yum. Then on to Lucy's apartment and more red wine and catching up. Somehow, we arrived home at 3 am with 3 new Steve Keene paintings. Yippee!

The next day we went to a great flea market in Ft. Greene with some other old friends and their 3 lovely daughters. Great quesadillas, empanadas, and asian dogs. Then just made it back to Manhattan in time for an hour of ICFF before it closed.

Wow. It's big. We took Linda's advice and walked as fast as we could until we saw something that blew us away.  And I will save that for our next post...